Christmas Gingerbread House Recipe
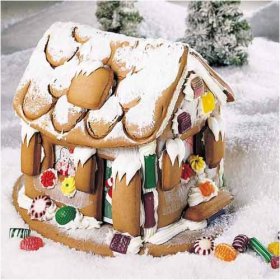
Build an traditional German Gingerbread House (Lebkuchenhaus)
A Gingerbread house is a part of Christmas holiday traditions all over the World. Beware that building a Gingerbread House is a time consuming work, but you and your family will be rewarded with the result. Ones your House is ready decorated and placed under the Christmas tree...
Sure you could simply buy a construction Kit, or you even find “ready” Houses in supermarkets around Christmas time. But, not even spend one second on this thought! (this is not only as an opinion of an traditional baker...)
Building a Gingerbread house is a family event. Its a project for the whole family and a chance to spend a good time and involve your children. It will bring their eyes to sparkle.
For me this tradition, is one of the most remembered and loved part of Christmas of my childhood. When I was a child the gifts under the tree were the one of the more important part. But do you think, I would remember those gifts today?
I have great memories - standing with my mom in the kitchen preparing Christmas treats.
We baked together the most funny and best tasting cookies and Gingerbread Houses. Some were so beautiful - others gave us so much to laugh.
We baked together the most funny and best tasting cookies and Gingerbread Houses. Some were so beautiful - others gave us so much to laugh.
We invite you to try our original German recipe. Lets get started For better handling, I recommend to prepare the dough one or two days before. It will be easier to work with.
Just let him rest in an airtight container at a dark place at room temperature.
| Table of contents | ||
| The Gingerbread House Ingredients | ||
| Royal Icing Ingredients | ||
| Starting the Gingerbread dough | ||
| Prepairing the Royal Icing | ||
| The Construction | ||
| The Decoration | ||
| The Reward for the par | ||
INFO |
Traditional German Gingerbreads using potash and ammonium carbonate as leavening agent. Ammonium Carbonate must be handled with care ! The powder can causes irritation to skin and eyes and the vapor is strong acid. Its harmless once its baked. Because this is a family recipe, we altered the recipe for you and substituted the leavening with baking soda. Which gives a good result and your children will be able to be involved in the baking process. |
| 1.The Gingerbread House Ingredients: | ||||||||||||||||||||||||
The Gingerbread Dough:
| ||||||||||||||||||||||||
| 800g | Sugar Powder (Icing Sugar) | |
| 5 Egg white * | Separate the white eggs. These will be used for the Icing decoration and glue for the house. Save the egg yellow for later. We prepared a little extra recipe for you the parents. A reward for the evening! |
| 1. | Bring honey and water to boil and let cool. | |
| 2. | In the meantime: Chop the candied fruits very fine. | |
| 3. | Now combine the flour, the chopped candied fruits and gingerbread spices in a bowl. Stir together by hand and make a well in center of the flour mixture. | |
| 4. | (If you chosen the darker type of gingerbread add the molasses to the warm honey and blend together) | |
| 5. | Pour the nearly cooled honey (or honey-molasses mixture) into the well. Cover with flour from the edge. | |
| 6. | Knead into a smooth dough. You can do this by hand, but a machine hand mixer or a “Kitchenaid” will work well. You may have to divide the portions, depending on the size of your mixing bowl. | 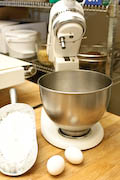 |
| 7. | If you have the feeling the dough is sticky add one or two hands of flour until the doughs gets smooth. | |
| 8. | Now knead in the baking soda. The soda must be well and evenly distributed! | |
| 9. | Store the ready dough in a airtight plastic container and let it rest one or two days at a dark place at room temperature. The dough will be easier to handle. | |
Cutting and baking:
To cut out the parts of your gingerbread house the dough should be rolled out evenly to a ¼ inch (0.6 cm) thickness. Its important, because we want all the parts have about same thickness after baking. TIP | |
With a little trick its easy and very comfortable to roll out the dough to an even thickness. In your local Hardware store search for two wooden strips each ¼ inch (0.6 cm) thick. The stripes will support your rolling pin and the rolling can be a joy! |  |
| . | Your working table should be well floured to prevent the rolled dough from sticking to the surface. | ||
| 3. | Roll out the dough to ¼ inch (0.6 cm). Use always a little amount of dough by time. | ||
| 4. | Now place one of the layout pattern on the dough, using a sharp knife and cut around the edges. |  | |
| 5. | Save the dough scraps for decorating elements, like a chimney, trees, roof tiles, fences .. | ||
| 6. | With the help of a spatula, lift the cuttings gently onto a baking paper. | ||
| 7. | Continue till all the pieces are cut. You have two front panels, two sidewalls and two roof parts. |  | |
| 8. | Cut now a door on one of the front panel, keep the door for baking. | ||
| 9. | For the windows cut out two rectangle from each sidewall. The rectangle parts will be cut again in half to form the shutters. You can already glue them in place with a little bit of egg white before baking. (like we say: “what is done is done”) | ||
| 10. | Now we need the base for the house. The recipe is designed that you will have enough dough left for baking a gingerbread base. The base is not included in the cut layout you printed. It can have any form you desire. I always make a larger base for the house, with enough place for a garden and all my decorating. The base should be more thick then the rest of the parts to give you a stable platform. A thickness of ½ inch (1.2 cm) should work well. |  | |
| 11. | Depending on the size of the platform, you will have some dough left for decorating elements. Or we could make some delicious cookies? | ||
| 12. | Brush the top surfaces of the cuttings with milk before baking. | ||
| 13. | Using an electric oven bake the cuttings at 200 Celsius (380 F) for about 15-20 minutes. The baking time may vary, depending on your oven and the thickness of the parts. Check the dough from time to time. Bake until nearly firm in center. The base of the house will need a bit longer. | ||
| 14. | Let the gingerbread cool completely before starting building the house. You may store the parts in an airtight container or plastic wrap and store it up to one month. | ||
TIP |
| With the rest of the dough you can make some delicious Gingerbread cookies. Before baking brush them with milk. Allow them to cool completely. Use the rest of the royal icing for the topping or melt some chocolate in a water bath. With a little trick stored gingerbread stay or get soft. Place a sheet of baking paper (parchment paper) with some apple skins on top of the cookies and store the cookies in an airtight container. |
Its time to start building our house. Its a bit work and you would love to have four hands. But with some help its not that difficult. If you constructing the house yourself, prepare some Tools to help you handling the fresh glued parts. A String, or one or two food cans can support the fresh iced walls till they start to dry.
TIP |
Royal Icing dries real fast. Be sure to cover it good with a plastic. A more secure way is not to do all the Icing recipe at ones. Divide the recipe for the icing to your need. Otherwise you are finished with the basic house gluing and by the time you want to start your decorating the rest of the Icing may be hard already. Example: 1 Step.: 2 egg white + 320 g icing sugar 2 Step.: 2 egg white + 320 g icing sugar 3 Step.: 1 egg white + 160 g icing sugar This will give you some extra time. |
The Royal Icing:
| 1. | In a mixing bowl combine the egg whites and the sugar powder. |  |
| 2. | Start mixing using a machine on a slow speed. After turn on higher speed to bend. | |
| 3. | Mix a few minutes. Make sure that all the powder from the corner of the bowl is mixed as well. | |
| 4. | When ready you will have a shiny sticky Royal Icing, the glue and decorating snow for your house. |  |
| 5. | Wrap with a plastic immediately, before further working. |
Now we are ready to construct the house!
To apply the icing, we use a “pastry bag”. If you find out now that you do not have a pastry bag – do not panic! We can easily build one ourself, which will work fine. In this case use a plastic freezer bag and cut a little edge from one corner. Start with a small cut, if you need adjust your cutting.
Before starting, be sure to protect your table or workspace with a plastic tablecloth or similar.
The icing will stick like clue. (But we want it like this, right?)
| 1. | Prepare the “pastry bag” with the first amount of icing. | |
| 2. | Place the base on the table. |  |
| 3. | Take one of the front cuttings and a sidewall. | |
| 4. | Now apply generous the icing to the bottom and the side edges of your front piece. Now continue with one of the sidewalls. Join both pieces together and glue it together on the base. You will need to hold it for a while until the icing sets, or support, for example with with a food can, till the icing hold. |  |
| 5. | Continue with the next front element and later add the last sidewall. |  |
| 6. | Now the walls are done, apply (generous again!) icing to all the joining edges. If you want the perfect stability do this inside and outside. Later when we start to decorate the house these glue lines will receive a beautiful finish border. | |
| 7. | Let the icing dry completely. This will need no longer then about 10-15 minutes. | |
| 8. | Now apply the icing on the top edges of the walls and start to attach the first roof part. We continue applying some icing of the edge of the roof and attach the second roof piece. |  |
| 9. | Now the construction part of the house is done. Be sure to give it some time for drying before the decoration part. Maybe its a good time to use the egg yolk for the parents reward! |  |
| Now its time for the fun part ! The decoration of our house. This part will be yours. Since the whole family is involved now, you will not risk running out of ideas. Kids have a great imagination you can count on them! If you miss some decorating Elements, check your local supermarket again for candies and ideas around the sweets shelve. Happy decorating !! |  | |
Tips and tricks: Some ideas to start:
|
Construction Errors (holes and cracks) Something went wrong or even cracked? The Royal Icing will fix this easily. Fill cracks and gaps with icing and give the repair some time to dry. Candies and cookies are also a great way to hide some minor mistakes. |  | |
Ice and Snow: Using the pastry bag with various decorating tips. You can create great looking icicles using a small paper and form a little pastry bag out of it. Drop small lines of icing from the eaves of the roof. |  | |
Painting and coloring with Icing: The royal icing can be uses as paint as well. Dilute a small amount of Royal Icing with a few drops of water. Use a Kitchen brush or watercolor brushes from your children for painting. You can find food color for designing cakes in your local supermarket. Mix a few drops with some part of your icing. Please make sure you protect your table. The food color is hard to remove from wooden surfaces. | ||
Windows: Leaves of gelatin are a nice way to simulate glass windows. Its easier to install them before mounting the roof to have access for gluing them from inside of the house. You can also find colored leaves of gelatin. | ||
Creating a driveway: Paint a path for your driveway leading to the door with you icing paint. To give a gravel walk look you can crush some colored candies and sprinkle them over the fresh painted path. | ||
Lights: A little light inside the house can create wonderful effects on the evening. (I do not recommend using a candle or a stove light! Not only for safety reasons. The heat of the candle will bring your icing to melt and your hard work could fall together like a card house.) A flashlight lamp connected to a battery will do the trick. You find replacement lamps for flashlights and the cables in you local electronic store. Maybe you find a switch for the lamp, too. They sure can assist you. Carefully drill a little hole with a screwdriver on the bottom of your gingerbread base and install the lamp and the cables. | ||
After all this work on the Gingerbread house – you merit a reward !
Credit to: http://www.lamiematinale.ca/index.php?id=72&L=1
4 comments:
Beautiful and lovely but I don't think I have the patience to do this.
mmg lawa, tp nak membuatnya..alahaii..
wahhh...nak cuba buat macam mana ni, payah je nampak...kalau nak robohkan rasanya senang je hehehe...
kalo nak wat nie mesti menguji kesabaran T_T